Depth estimation from a single image with Depth Anything V2
Learn how to estimate depth from a single image, a video, or your webcam using Depth Anything V2 and a clean, reusable Python class.
Estimating depth used to mean two cameras and a lot of calibration, or an expensive LiDAR unit bolted to the top of a rig. Depth Anything V2 throws most of that out. You hand it a single ordinary photo, and it hands back a dense depth map: a per-pixel guess at how far everything is from the camera.
In this guide we run Depth Anything V2 on an image, a video, and a live webcam using one small, reusable Python class. No stereo pair, no depth sensor, just one model and a few lines of code.

What is Depth Anything V2
Depth Anything V2 is a monocular depth estimation model. "Monocular" is the important word: it works from one image, not a stereo pair. Given an RGB frame, it predicts a depth value for every pixel, so you get a full depth map instead of a sparse point cloud.
A few things make it stand out from older approaches like MiDaS:
- The training recipe is clever. Instead of chasing more labeled real photos, the authors trained a strong teacher on high-quality synthetic images, then used it to pseudo-label a huge pile of unlabeled real images. The student model learns from those labels, which gives it sharp edges and thin structures that older models smear over.
- It comes in sizes. There are ViT-Small, ViT-Base, and ViT-Large encoders, so you can trade accuracy for speed depending on your hardware.
- It is fast. The small model is light enough to run on a CPU for single images and comfortably real time on a GPU for video.
- It is robust. It holds up on scenes it never saw during training, from close-up faces to wide outdoor shots.
By default the model returns relative depth. That means it tells you what is near and what is far, on a consistent scale within one image, but not the actual distance in meters. That is exactly what you want for visualization, background blur, or 3D effects. If you need true metric depth, there are separate fine-tuned checkpoints for that, and we will point to them at the end.
What you need
Depth Anything V2 ships as a GitHub repo with a small Python package inside it. Clone it, install the requirements, and download one checkpoint:
# 1. Clone the official repo
git clone https://github.com/DepthAnything/Depth-Anything-V2
cd Depth-Anything-V2

# 2. Install dependencies
pip install -r requirements.txt
Then grab a model checkpoint and drop it in the repo folder. Each encoder has its own file:
- Small: depth_anything_v2_vits.pth
- Base: depth_anything_v2_vitb.pth
- Large: depth_anything_v2_vitl.pth
The filename matters. The class below builds it from the encoder name, so vits looks for depth_anything_v2_vits.pth. Keep the checkpoint next to your script inside the Depth-Anything-V2 directory.
A quick note on licensing: the small checkpoint is Apache 2.0, while the base and large weights are released under CC-BY-NC-4.0 (non-commercial). If this is going into a product, reach for the small model or the metric variants that suit your license.
The full script
Here is the complete script. Save it as depth_anything_v2.py inside the Depth-Anything-V2 folder so the depth_anything_v2 package imports cleanly. We walk through the important parts right after.
import cv2
import torch
import numpy as np
import matplotlib
from depth_anything_v2.dpt import DepthAnythingV2


class DepthAnythingPredictor:
    def __init__(self, encoder="vitb", device=None):
        self.device = device or (
            "cuda" if torch.cuda.is_available()
            else "mps" if torch.backends.mps.is_available()
            else "cpu"
        )

        model_configs = {
            "vits": {"encoder": "vits", "features": 64,
                    "out_channels": [48, 96, 192, 384]},
            "vitb": {"encoder": "vitb", "features": 128,
                    "out_channels": [96, 192, 384, 768]},
            "vitl": {"encoder": "vitl", "features": 256,
                    "out_channels": [256, 512, 1024, 1024]},
        }

        if encoder not in model_configs:
            raise ValueError(f"Invalid encoder: {encoder}")

        # Load model and weights, then move to the chosen device in eval mode.
        self.model = DepthAnythingV2(**model_configs[encoder])
        self.model.load_state_dict(
            torch.load(f"depth_anything_v2_{encoder}.pth", map_location="cpu")
        )
        self.model = self.model.to(self.device).eval()

        # Colormap used to turn a raw depth map into a viewable image.
        self.cmap = matplotlib.colormaps["turbo"]

    def infer_image(self, image):
        """Run depth estimation on a single BGR image (as read by OpenCV)."""
        return self.model.infer_image(image)  # float32 depth map, HxW

    def colorize(self, depth):
        """Normalize a depth map to 0-1 and apply the turbo colormap."""
        depth_norm = (depth - depth.min()) / (depth.max() - depth.min() + 1e-8)
        colormap = self.cmap(depth_norm)[:, :, :3]        # RGB float in 0-1
        colormap = (colormap * 255).astype(np.uint8)
        return cv2.cvtColor(colormap, cv2.COLOR_RGB2BGR)  # back to BGR for OpenCV

    def infer_and_save_image(self, img_path, save_path="depth.png"):
        """Infer depth from an image file and save the colored depth map."""
        img = cv2.imread(img_path)
        depth = self.infer_image(img)
        color = self.colorize(depth)
        cv2.imwrite(save_path, color)
        return depth, color

    def infer_video(self, video_path, save_path="depth_video.mp4"):
        """Run depth estimation on a video (or webcam index) and save the result."""
        cap = cv2.VideoCapture(video_path)

        fps    = cap.get(cv2.CAP_PROP_FPS) or 30
        width  = int(cap.get(cv2.CAP_PROP_FRAME_WIDTH))
        height = int(cap.get(cv2.CAP_PROP_FRAME_HEIGHT))

        writer = cv2.VideoWriter(
            save_path,
            cv2.VideoWriter_fourcc(*"mp4v"),
            fps,
            (width, height),
        )

        while True:
            ret, frame = cap.read()
            if not ret:
                break

            depth = self.infer_image(frame)
            color = self.colorize(depth)
            writer.write(color)

            # Optional live preview; press "q" to stop early.
            cv2.imshow("DepthAnythingV2", color)
            if cv2.waitKey(1) & 0xFF == ord("q"):
                break

        writer.release()
        cap.release()
        cv2.destroyAllWindows()


if __name__ == "__main__":
    depth_model = DepthAnythingPredictor(encoder="vits")

    # Inference on a single image
    # depth, color = depth_model.infer_and_save_image("bus.jpg",
    #                               save_path="depth_turbo.png")

    # Inference on a video
    depth_model.infer_video("fish.mp4", "depth_output.mp4")

    # Inference on a webcam
    # depth_model.infer_video(0, "depth_webcam.mp4")
It's time to watch the Output 🚀
How the code works
The whole thing is one class, DepthAnythingPredictor. Load it once, then reuse it for as many images or frames as you like. Let us go through it piece by piece.
Pick the device and load the model
Depth models are heavy, so you load them a single time in __init__. First we choose the best available device, then load the weights that match the encoder.
self.device = device or (
    "cuda" if torch.cuda.is_available()
    else "mps" if torch.backends.mps.is_available()
    else "cpu"
)
This walks down a short priority list: an NVIDIA GPU (CUDA) first, then Apple Silicon (MPS), and finally CPU as a fallback. You never have to pass a device by hand, but you still can if you want to force one.
The model_configs dictionary holds the architecture settings for each encoder. This is the part people get wrong: the config you pass to DepthAnythingV2(...) has to match the checkpoint you downloaded. Ask for vits and the class both builds the small architecture and loads depth_anything_v2_vits.pth, so the two always line up.
Run inference on one image
The repo does the hard work for us. Its infer_image handles resizing, normalization, the forward pass, and resizing the result back to the original resolution.
def infer_image(self, image):
    return self.model.infer_image(image)  # float32 depth map, HxW
The output is a plain 2D NumPy array the same height and width as your input. Each value is a relative depth: larger means closer to the camera. It is not an image you can view directly yet, which is where the next method comes in.
Turn a depth map into something you can see
A raw depth map is just floating-point numbers. To look at it, we squash the values into the 0-1 range and run them through a colormap.
depth_norm = (depth - depth.min()) / (depth.max() - depth.min() + 1e-8)
colormap = self.cmap(depth_norm)[:, :, :3]
colormap = (colormap * 255).astype(np.uint8)
return cv2.cvtColor(colormap, cv2.COLOR_RGB2BGR)
Two details worth noticing:
- The
+ 1e-8is a tiny guard so we never divide by zero on a flat image whereminequalsmax. - Matplotlib gives colors back as RGB, but OpenCV expects BGR, so we convert at the end. Skip that swap and your reds and blues come out reversed.
We use the turbo colormap here because near and far read intuitively, but you can swap in any Matplotlib colormap, for example "magma" or "Spectral", by changing one line in __init__.
Save an image result
infer_and_save_image is the convenience wrapper for a single file: read the image, infer depth, colorize, and write it out.
img = cv2.imread(img_path)
depth = self.infer_image(img)
color = self.colorize(depth)
cv2.imwrite(save_path, color)
It returns both the raw depth array and the colored image, so you can keep the numbers for further processing while also saving a preview.
Process a video or webcam
infer_video opens a source with OpenCV, then loops frame by frame. The neat trick is that the same method handles both a file and a webcam, because cv2.VideoCapture accepts either a path string or a device index like 0.
cap = cv2.VideoCapture(video_path)
fps = cap.get(cv2.CAP_PROP_FPS) or 30
We read the source frame rate and size so the output video matches the input. The or 30 is a small safety net, since some webcams report a frame rate of 0. Inside the loop we infer depth, colorize, write the frame, and show a live preview you can quit any time by pressing q. When the stream ends, we release the writer and capture and close the window.
Running it
Point the script at a video and let it run:
depth_model = DepthAnythingPredictor(encoder="vits")
depth_model.infer_video("fish.mp4", "depth_output.mp4")
You get depth_output.mp4, a colored depth version of your clip. For a single photo, uncomment the image line and give it a file:
depth, color = depth_model.infer_and_save_image("bus.jpg",
                            save_path="depth_turbo.png")
Want the biggest, sharpest depth maps? Change one argument:
depth_model = DepthAnythingPredictor(encoder="vitl") # needs the vitl checkpoint
That is the whole point of the config table: switching model size is a single word, as long as you have downloaded the matching checkpoint.
Where this is useful
A cheap, single-image depth map opens up a lot of practical work:
- Portrait and background blur: blur everything past a depth threshold to fake a wide-aperture look.
- 3D photo effects: drive a parallax or "2.5D" animation from the depth map.
- Robotics and drones: get a rough sense of obstacles from a single camera when LiDAR is not on the budget.
- AR and scene understanding: place virtual objects at believable distances.
- Image and video editing: depth-aware relighting, fog, and compositing.
- Dataset creation: generate pseudo depth labels to bootstrap other models.
Tips for better results
- Match the model to your hardware. Use
vitson CPU or for real-time video, andvitlon a GPU when quality matters most. - Remember it is relative depth. The scale resets per image, so you cannot directly compare depth values across two different frames. For consistent metric distances, use the metric depth checkpoints.
- Feed it clean input. Sharp, well-lit frames give cleaner depth than motion-blurred or very dark ones.
- Resize huge frames first. 4K video is slow. Downscaling before inference speeds things up a lot with little visible loss for previews.
Wrapping up
Depth Anything V2 makes monocular depth estimation almost boring, in the best way. One model, one call, and any photo or video turns into a depth map you can build on. With the small class above you can drop it into any project and start experimenting in minutes.
If you are building depth, 3D, or vision features and want a hand, book a free consultation or read more tutorials. 🚀
FAQs
- Q:What is Depth Anything V2?
- A:Depth Anything V2 is a monocular depth estimation model. It looks at a single RGB image and predicts how far every pixel is from the camera, producing a dense depth map without stereo cameras or LiDAR.
- Q:Do I need a GPU to run Depth Anything V2?
- A:No. It runs on CPU, and on Apple Silicon it can use MPS. A CUDA GPU is far faster and is worth it for video, but the small ViT-S model is quick enough to try on CPU.
- Q:Which encoder size should I use?
- A:Start with the small (vits) model for speed, move to base (vitb) for a good balance, and pick large (vitl) when you want the sharpest, most accurate depth and have a GPU to spare.
- Q:Does Depth Anything V2 give metric depth in meters?
- A:The default models predict relative depth, which is great for visualization and ordering objects near to far. For real-world distances in meters, use the separate metric-depth checkpoints fine-tuned on indoor or outdoor data.
- Q:Can Depth Anything V2 process video in real time?
- A:Yes, with a GPU. The small model runs at interactive frame rates on a modern GPU, and the script in this guide writes a colored depth video frame by frame while showing a live preview.
Related posts
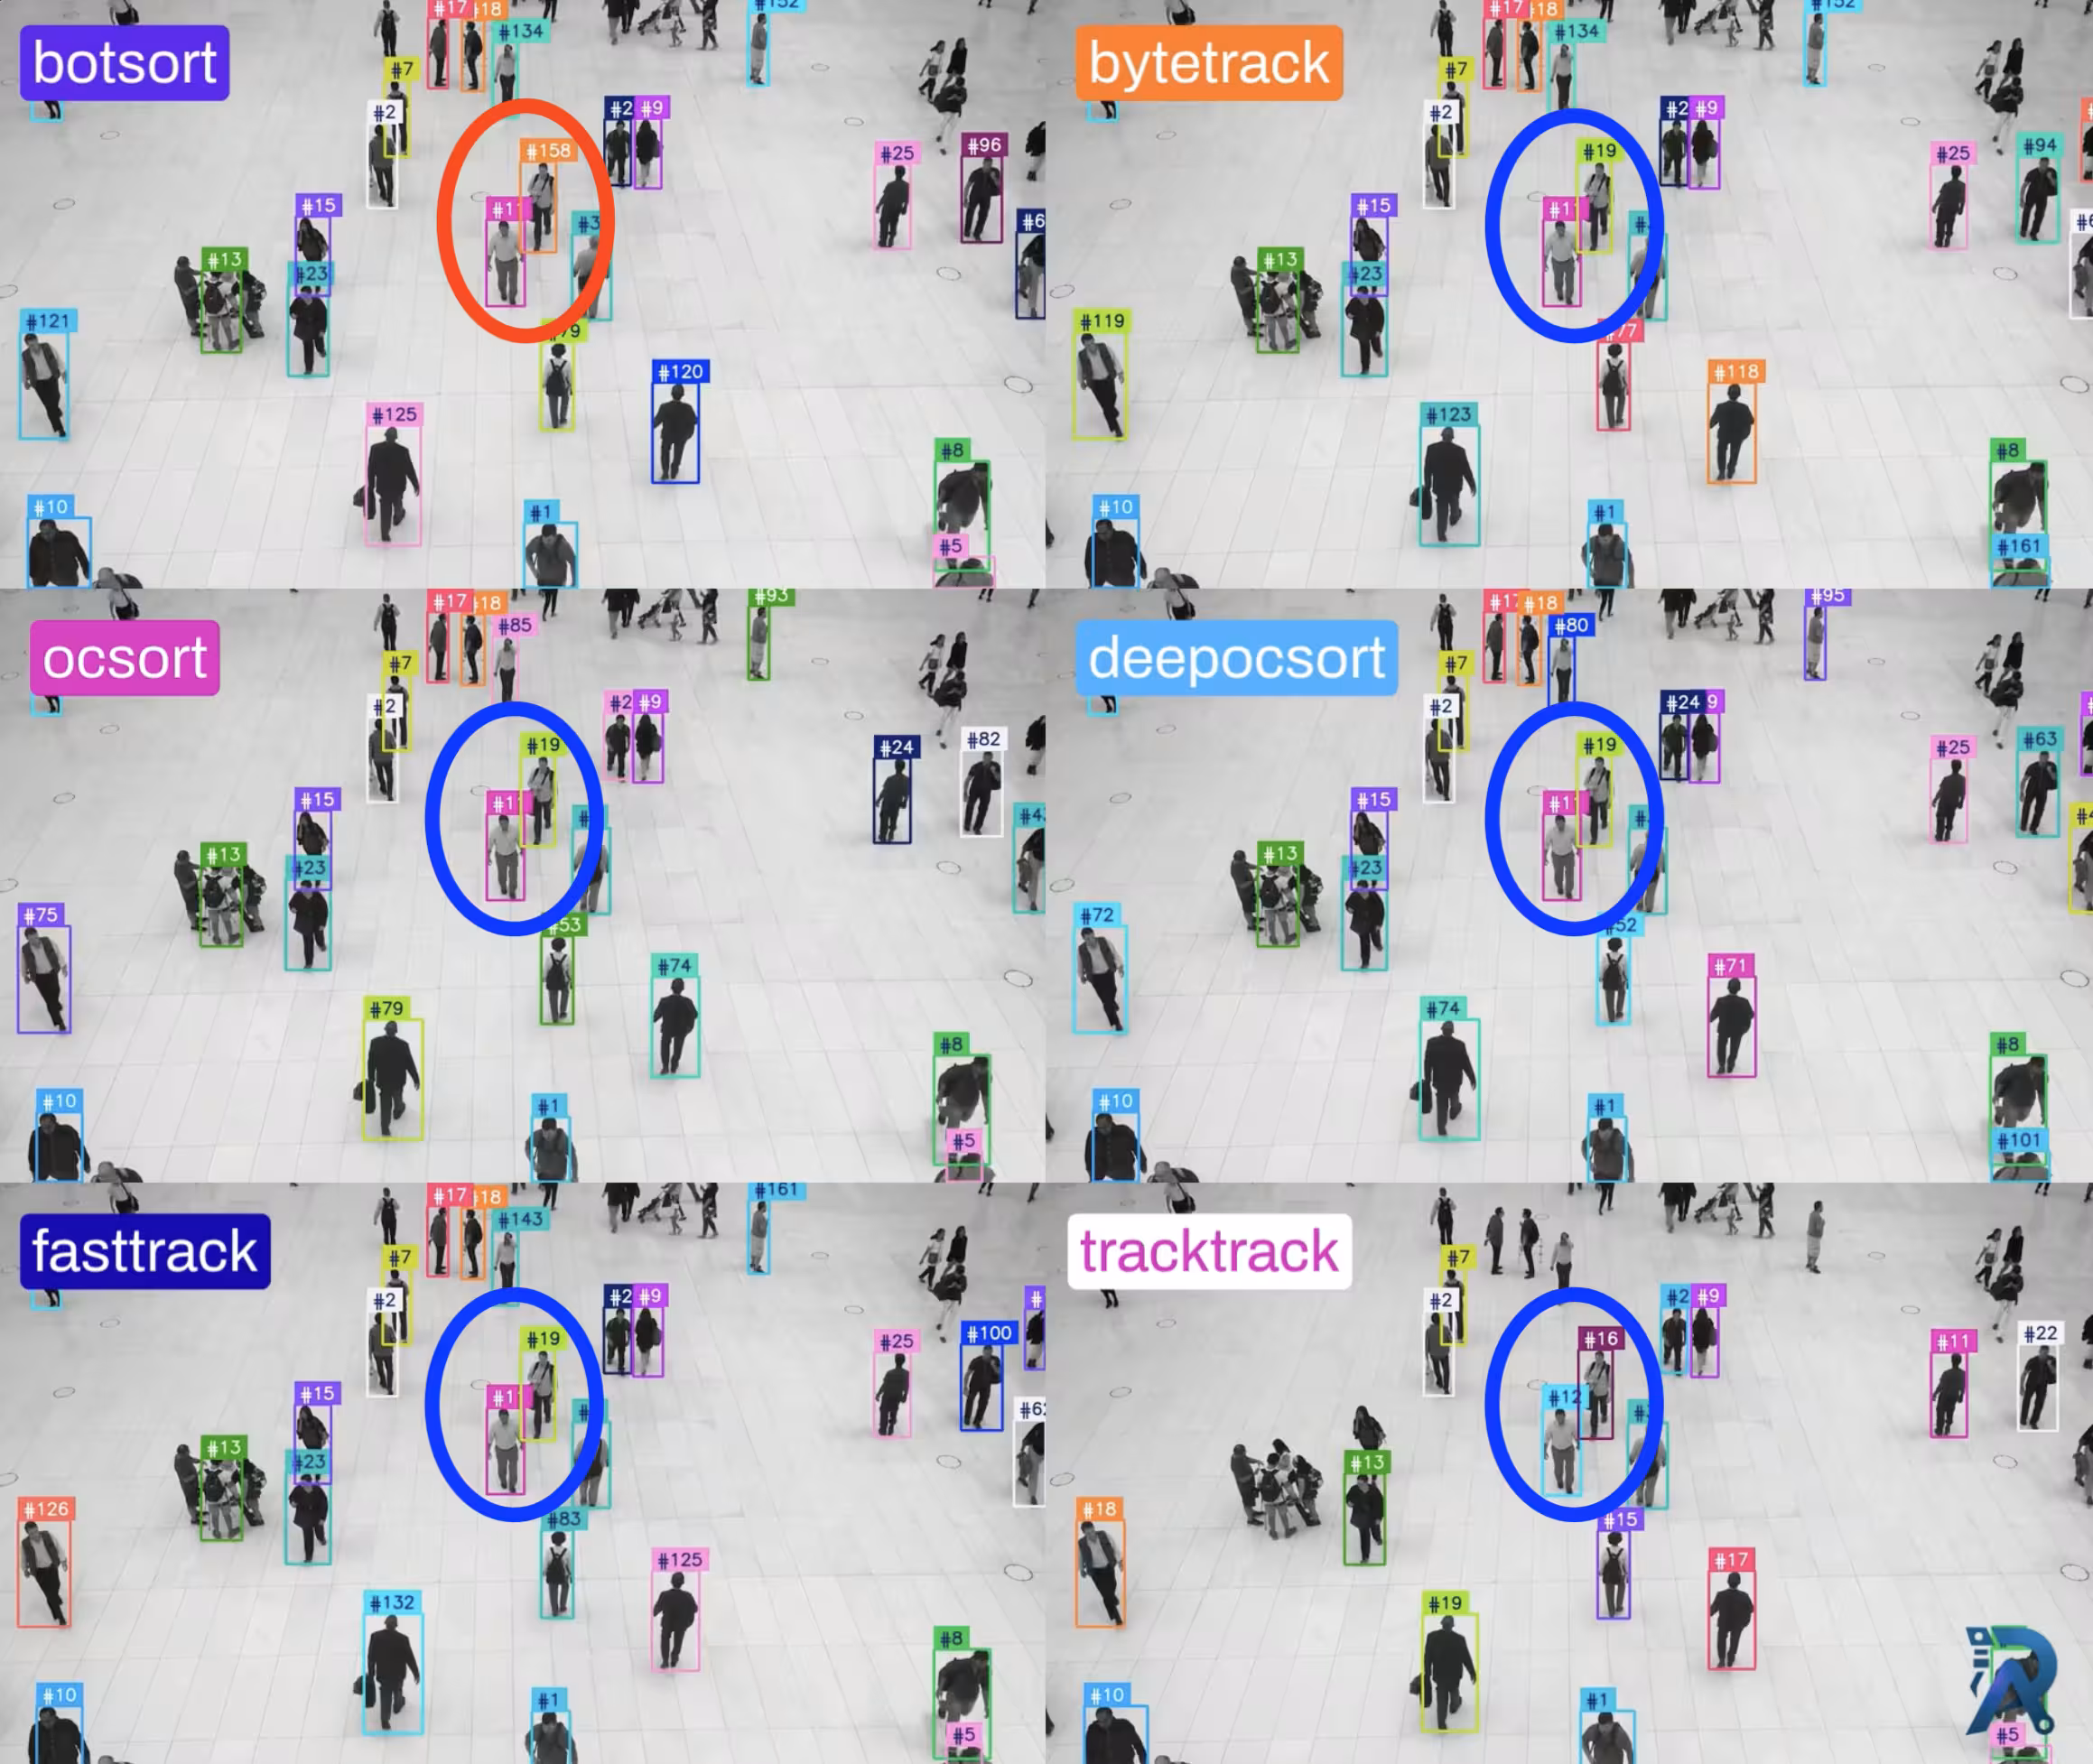
Ultralytics object trackers comparison: ByteTrack, BoT-SORT & More
How do the six Ultralytics trackers actually behave on the same footage? A look at BoT-SORT, ByteTrack, OC-SORT, Deep OC-SORT, FastTrack, and TrackTrack, their internals, trade-offs, and side-by-side results on ID switches, ID stability, and FPS.
Read article →
How to extract text from images with LightOnOCR and Python
Learn how to read text from images using LightOnOCR, a small and fast vision language model, with a clean and reusable Python class.
Read article →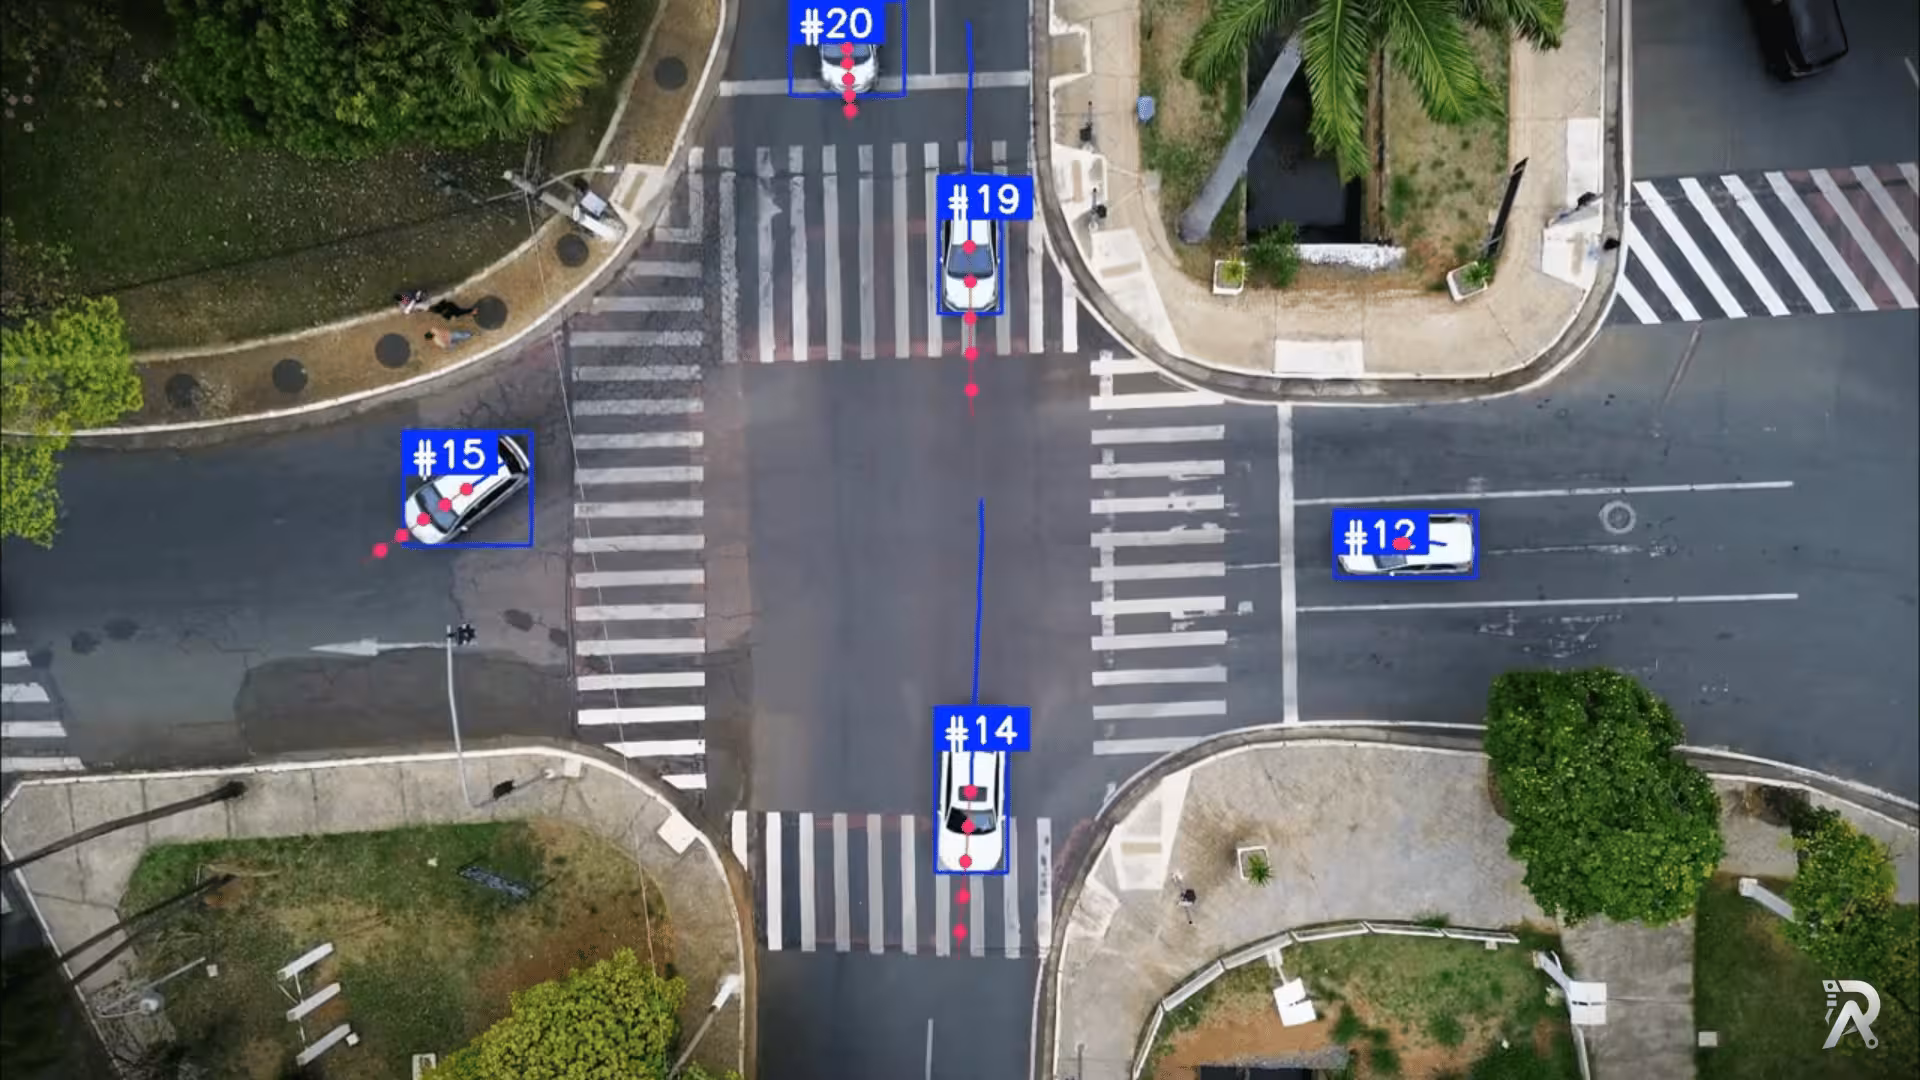
Object tracking and trajectory forecasting with YOLO26 and ByteTrack
Detect, track, and predict the future path of people and vehicles using Ultralytics YOLO26, ByteTrack, and a lightweight velocity-based forecasting model.
Read article →
Computer Vision Engineer and top contributor to the YOLO project, building production AI and deep learning systems.
My course on LinkedIn LearningHands-On AI: Computer Vision Projects with Ultralytics and OpenCV